I started my PMP journey a few months ago and appeared for the exam last Friday. Happily, I passed and am now PMP certified.
I think it’s a great idea to share lessons learned with the many PMP aspirants on this forum.
I remember scouting around for information that would help me make sense of the various steps involved in getting certified. There were many resources that helped me. PM Prepcast’s “How to Get PMP Certification in 10 Easy Steps” was one very useful resource (
www.project-management-prepcast.com/how-...ion-in-10-easy-steps
).
There were quite a few other resources as well, and I ended up collating information from all of them, to get started with my own journey. While I do not have the links handy as references to all of the material I went through, I can definitely share the resultant knowledge I gleaned from going through them all. I hope my experiences can help someone move forward with their own path to certification (and beyond!)
As most of us here know, the process of applying for and becoming certified is involves many detailed steps. A lot of people have commented on how the very process of preparing for your PMP exam is a project in itself, and I have to agree. I did make my own project plan and track my progress against it. But more on that later!
Given the various stages involved in the PMP certification process, I decided to break down my learnings into 6 sections, so that it’s organized logically. Not every section will be relevant to everyone, so it also helps to identify what you want to read and skip straight to it!
(1) Exam Application:
For many people, the PMP exam application is daunting enough in itself. The reason for this is that you need to have a lot of things ready and need to be able to enter all of this into the application form. This is not easy to do unless you’ve already prepared a template containing all the information you’ll need.
For this, you’ll need to have an idea of the various types of information you will be asked to fill in, once you begin your application.
As a good starting point, it’s good to review the prerequisites to the applying before you start the process (this is found in the PM Prepcast link above). Next, it is useful to prepare a template which will reflect the format in which you will be asked to enter the information.
I’ve included screenshots of my own excel template which I used to first gather all the necessary data. It also helped me calculate the number of hours of PM experience I had to ensure I satisfied the requirements. This might seem like a lot of work, but it truly makes your application process a breeze. And it needs only simple excel formulae to help calculate and verify your work experience.
Screenshot 1: List of projects with start and end dates, and contact information for references for each project.
Screenshot 2: Calculation of working days (see formula) and hours for each project and split of hours across the 5 process groups.
In addition to this, it is good to prepare a brief project description for each of your projects. You can use a separate document (MS Word is good, since it allows you to keep a count of the number of words).
Screenshot 3: Example of a project description split across the process groups (with a word limit check).
It is useful to compose the project description keeping in mind the split of hours across the process groups that you’ve already identified. Also, do keep track of the word limit – the application allows you to use up to 550 words to write your project description. Try to be as brief as possible while mentioning the key achievements / work performed by you.
At this point, it is a very good idea to contact your references and let them know that you’re applying for the PMP certification (if you haven’t already informed them). Discuss your project descriptions and other details with them to ensure they’re on board with what you’ll be submitting in your application. In my case, after a discussion, I also sent them an email with the exact text I was planning to use so that they could go through it and let me know if they had any comments. Doing all of this not only makes you confident in your application, it also will help you a lot if your application is selected for audit. (Mine wasn’t, but if it was, I already had most of the documentation I’d need).
Once you’re ready with all of this, the application becomes very easy – you simple have to copy all of the data you’ve prepared, review it for completeness, and submit your application. (Good luck!)
NOTE: I'd tried to upload an excel template here in case anyone might want to use it to fill in their details. Unfortunately, I am unable to upload it here (cannot convert xlsx to xls on my laptop)
If anyone would like to access this, please let me know (please also let me know how to convert my excel file to .xls)
(2) Completing the 35 contact hour requirement:
Well, this is probably an obvious step, given that I am posting it here, in the PM Prepcast Lessons Learned section. But yes, even outside of this forum, I would definitely recommend the Prepcast lessons as the best and most convenient way to complete the contact hour requirement of the PMP exam.
The lessons are explained in a lot of detail, and are genuinely enjoyable to watch and listen to. The only thing I would say is that how fast you get through them would depend on your familiarity with the subjects covered. So, do get a sense of how comfortable you are with a particular topic and set your pace accordingly. If you need to, revisit some of the sections that you are unfamiliar with.
For instance, I was quite familiar with the scheduling and quality knowledge areas given my engineering, manufacturing and operations management background – so I found I could breeze through these sections very fast. I slowed down in the Stakeholder Management sections though, since there were new ideas and concepts that I wanted to absorb. So, in summary, how you go about listening to (and revisiting) the Prepcast episodes will really vary given your background and experiences till date.
(3) Creating a Study Plan:
Yes it does help to create a study plan. This can be as detailed as you want, depending on how you like tracking your progress. It also depends on what your constraints are, and how you plan to work around them.
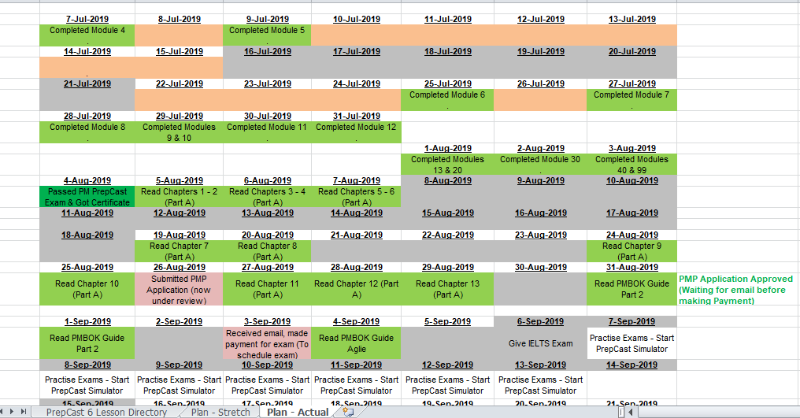
I’ve attached my own study plan for reference. In my case, given that I was crunched for time (extremely high workload at office) I decided to plan my schedule in small digestible portions per day. I also needed to track the dates I wouldn’t be able to study since I had a lot of travel scheduled already (I marked off the travel days in grey).
Screenshot 4: My planned study schedule by date.
The next step is to track your progress. My two cents is this: please do not underestimate the power of tracking your progress. The act of updating your progress against your plan is an excellent motivator, which will incentivize you to push yourself to try to exceed the targets you’ve set for yourself (especially if you’re very competitive with your own self!)
Screenshot 5: Tracking actual progress against the study plan.
(4) Studying for the Exam:
Many people have said this, but I will say it again: studying the PMBOK guide once is not enough.
Read it the first time to actually understand the many concepts covered. Read it a second time (faster this time) to digest the vast material and understand how it all fits together.
When you’re reading it a third time, make notes. Make notes in whatever format makes sense to you; use a method which will help you quickly remember what you’ve learned when you glance back at it. Aim to make an easy reference condenses summary of the various knowledge areas and process groups in the PMBOK guide.
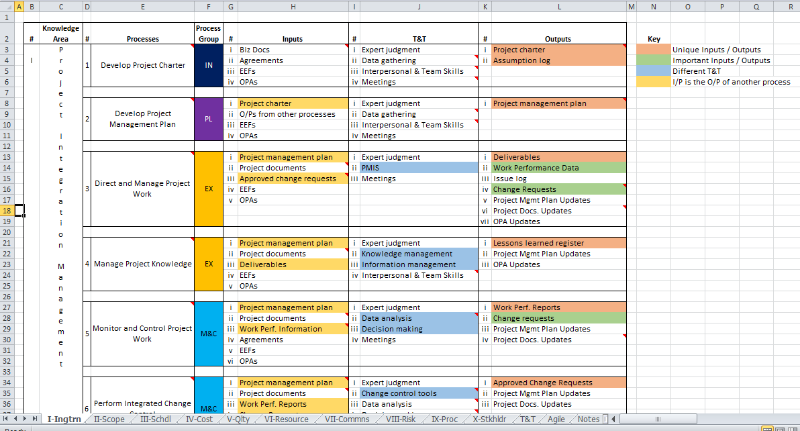
I’ve shared a screenshot of my own notes (on Microsoft Excel) below for reference. I split the information across knowledge areas – one sheet for each knowledge area. I summarized the key inputs, outputs and tools & techniques. I found it very useful to insert notes whenever there were any explanations I wanted to remember for any specific topic.
Of course, this is just an example, and each person would be different with their own formats for organizing information. But the key is this: create your own notes. Make it YOUR OWN representation of the knowledge you’ve gained so that you can revise your learning easily before the exam (it is not easy to read through the PMBOK guide each time you want a summary!)
Screenshot 6: My notes from studying the PMBOK guide (Integration Knowledge Area).
(5) Practice Exams - Using the Exam Simulator:
Once you’re done with the actual studying part, the next step is orienting your thinking to the way in which you’re likely to be tested. I’d recommend taking smaller tests at first, one for each knowledge area. Once you’re reasonably confident, it’s time to graduate to longer tests. Do not wait until you’re a hundred percent sure of every answer before you decide to proceed to the next step. After a point, you will see the concept of diminishing marginal returns in real life – the results for an incremental amount of studying will start to drop off after you hit say around the 85% mark. At this point, you’re ready to appear for your exam!
(6) Scheduling the Exam:
This again would vary greatly depending on your location. In my case, it is possible to schedule your exam at short notice, provided slots are available. So, it would be advisable to check the availability of exam slots at your nearest / preferred exam center beforehand. Alternately you could call the center and inquire on availability.
This will give you a reasonable idea of how much in advance you need to book your exam slot. In certain areas, I am fairly sure that you’d need to reserve your exam slot many weeks prior to the actual date. In my case however, I ended up booking my exam with just 3 days to spare. This gave me the benefit of booking my exam when I was fairly confident I was ready for it, rather than working towards a hard deadline. If you have this flexibility, use it! If not, set yourself a reasonable time frame to get comfortable with the study material and the exam format before you set a date.
Of course, it helps to be familiar with the exam venue and sign in formalities. Feel free to call ahead to verify the procedures if you need to. In my case, I’d been to the same test venue a few times before for other certification exams, so I felt quite comfortable on the day of the exam.
Needless to say, do arrive well in time for your exam, and breathe deeply. You will be fine!


